Wednesday, April 04, 2007

The sideboard


Jim had asked me quite a while ago, to build him a sideboard for him. He had seen the project in one of my woodworking magazines....oh, about a year or so ago. I told him I would build it for him when he was done, or almost done, moving around from apartment to apartment. Well, he is getting ready to get married and plans for the not to distant future include purchasing a home or having one built. So, with that in mind, I set about building the dining room piece for him and his fiance Mari.

The picture here is from the article detailing the plans for building the project.


I guess it took me about a month to complete the piece of furniture and it entailed a few techniques in woodworking that I had never tried before, so it was a good experience. It was a fun piece of furniture to build. And to tell you the truth, there is a bit of a story behind the wood used in building this piece. Since getting into woodworking seriously, I have pretty much dealt with one gentleman for getting my rough sawn lumber. Simmie Agin of nearby Lambertville was meticulous in his lumber. He oversaw its cutting from raw logs and then took over in the management of them while they cured. He was an artist in how he took care of the lumber. Stacked, stickers and dried straight as an arrow. I learned to appreciate that! Well, the red oak lumber that I used in this project is some of the last that I will ever acquire from Simmie. You see, Simmie died recently. It was a blow to me. I really liked him and looked forward to my visits with him at his barn where he kept the great collection of various species of lumber. I will certainly miss him. I have some more lumber from Sim, but I am still thinking of the right project to use to make the best use of what is left of my time with Simmie.

While I'm thinking, here is a picture of the sideboard, as I built it. I took this picture when Karen and I delivered it to Jim and Maris apartment.

Saturday, November 11, 2006

Jim and Mari's Pirates Treasure Chest

Wrapped up this little project today and am pretty happy with it. Our son and his fiancé asked me to build them a pirate’s treasure chest for their wedding (next Summer) reception for the guest to deposit their gift/money cards into as they enter the reception hall. They had no real specifications other than wanting it to be 19” wide by 13” deep and 15” tall. “Whatever you make will be fine with us.” I was told, so the imagination was cranked up.

I used #1 grade cedar with my original thinking of finishing it with a clear finish. Some testing of some of the cutoff scrap found that I didn’t like the look and besides, in the meantime, they told me they wanted it to have a dark finish. I opted for a multiple board look instead of solid sides and connected the pieces with glue and #10 biscuits. The lid is based on a framework subassembly and once I had that, it was easy to figure out how wide to make the nine slats so that they sat relatively flat on the curved framework. Two interior cross members were added inside the lid to help with lateral strength of the lid slats. All slats are glued and braded to the framework with the exception of the slotted one at top dead center which will be replaced with a solid piece once the wedding is over for future use by the married couple.

Used English chestnut stain and shot it with four or five coats of satin lacquer due to their not wanting it to be to “shiny”. They wanted it looking like it was an old piece. The simulated steel strapping on the exterior of the box is pine strips planed down to 1/8”, primed and painted gold to match the hardware and braded to the sides of the box with some brass plated round head pins that kind of simulate carriage bolt heads which could have been used on an actual treasure chest. On the lid, the strapping is screwed into place on alternate slats for further strength with the curvature of the lid in mind. There are pre-drilled holes on alternate slats for the same pins as on the side, but need to be inserted after the top slotted slat is replaced.

Three Stanley utility hinges swing the lid and a brass hasp assembly locks the front of the chest. Interesting that the screw leaf of the hasp, which is usually hidden behind its adjacent slotted leaf, was milled to be exposed on the front of the box, defeating its “locking” ability. I circumvented this problem by attaching the screw leaf on the inside lip of the tops front edge. Rope handles and an interior chain to keep the lid from hinging all the way back complete the project.


Thursday, August 10, 2006

My carpal tunnel problem

So, I finally had it done.  I'm relieved to say the least!
Photobucket - Video and Image Hosting


   I have been living with carpal tunnel problems for I guess about ten years.  I have put up with it, always telling myself that I will get around to taking care of it sooner or later.  Always putting it off.  Last years salmon fishing trip, detailed elsewhere in my blog, I told myself that it was the last fishing trip to Oswego,NY that I was going to have to put up with it.  You see, after about two hours of holding my fishing rod, my hand would go numb and I would have to hold the rod with the other hand while I shook my right hand and put it in the cold water to try to get feeling back into it.  From then on, I would probably have to do this about every fifteen or twenty minutes. 


  Well, November is coming up again, and I hadn't done anything about it.  My problem was getting progressively worse and about a month or so ago, I was pressure washing the sidewalks around the house and my hands got numb again.  That was the last straw.  Karen called my insurance company and asked about the coverage for the surgery and was told that it was covered 100%.  My insurance would pay me a certain amount each week while I was off and temporary disability also paid so much and it almost added up to what I was making per week anyway.  It was a no brainer.  Besides, if I was going to miss a couple of weeks worth of work, I was going to miss the hot weather.  Makes sense doesn't it?


   Typing this, basically with the left hand, I am one day past the surgery and it was surprisingly simple.  I wasn't nervous, maybe anxious is a better word.  I was truly happy that I was finally going to have this done and over with.  It was an outpatient kind of deal - I went into the Hunterdon Medical Center at 9:30AM and came out around 1:30 or 2PM.  The actual surgery was supposed to take about 15 minutes, but the surgeon told Karen after my surgery that it took about an hour because, in his words, it was "thicker" in there than he anticipated.  That is why in my first visit to him, his procedural tests to identify the problem really didn't show a carpal tunnel problem.


   It is quite eye opening to find out just how much you depend on your dominant hand for living your everyday life.  Tying your shoes, brushing your hair and teeth, putting on a pair of pants and trying to make yourself something to eat have already presented themselves as hurdles to me in my first day after the surgery.


  When I came out of surgery, I was surprised at low little pain there was.  I had forgotten that I was under anesthesia and last night, the pain finally came.  It wasn't tremendous pain, just a steady dull pain that won't let you forget it.  I had been prescribed some pain killer drugs, and I have taken a few, but honestly, I can pretty much do without them right now.  I plan on taking them before going to bed to help insure a good nights sleep, but I may go without them basically during the day.


   I have not regretted going through with this operation and I anxiously await the results.  I think the first real test will come in November, when we head back up to fish for salmon and I have the rod in my hand all day.  Then I'll know. Next year will be the left hand.

Tuesday, April 18, 2006

Woodworking Projects (Finally)


Since starting this blog, I have had a few people recommend that I post a feature showing some of the woodworking projects that I have completed here and there. I haven't gotten around to it, but again recently, I had a gentleman ask what kind of things I build in my workshop and I guess it's about time that I get around to getting these pictures available in the most convenient manner. I do have a small photo album that I try to keep updated. But sadly, I don't really keep it up to date and it's kind of a hassle to lug it around to show people. What follows is a sampling of some of the things that I have built.


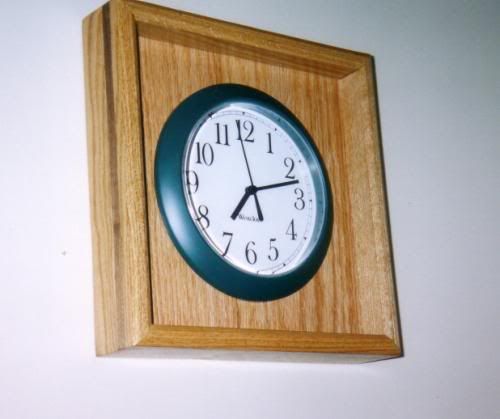
Below is a simple little project that I did just to keep busy. This was built out of red oak with a walnut inlay around its perimeter. The clock is a simple little twenty dollar clock - something like that. However, this was constructed a number of years ago when our house was hectic amid preparations for our son's graduation party. My wife was getting a bit harried and she told me to "get out of the way" - in no uncertain terms so I headed out to the shop and whipped this little creation out and it now resides on the wall in our family room.


Image hosting by Photobucket


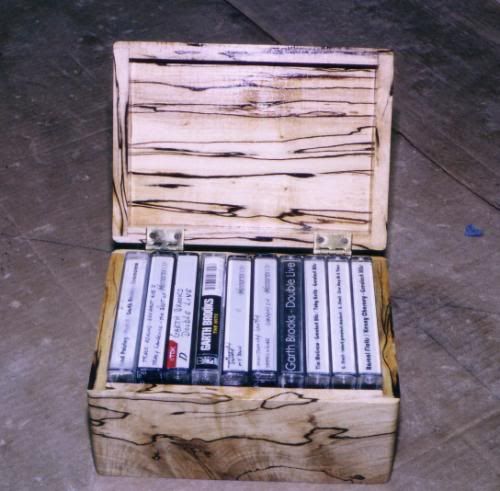
The picture below is a small cassette tape box that I built to keep music cassettes handy in my truck. The interesting figure in the wood is actually the beginning of the rotting/decay process. This process is called "spalting" and the particular wood in this case is maple. The dark lines in the wood is a fungus that begins the rotting and decaying process. You have to catch the process at it's beginning when it hasn't really begun to soften the wood. I found this particular wood while splitting firewood. That's right - it was destined to be burned in out wood stove, but I couldn't have that. I took it up to the shop and ran it through my bandsaw and made some small boards out of it and dried it over time and I beleive I still have some more of it up in the shop somewhere.


Image hosting by Photobucket


The story with the CD cabinet below is that a great many years ago, I was laid off from my job in construction and I had a lot of time to kill. This cabinet was constructed of scrap wood that was laying around the shop at the time. It was an interesting little project that sure was a bit tedious to do with having to cut all of the dado's in it to accomodate the CD's. I currently have plans to build another, much nicer cabinet for out in the bar room. A freind has asked me for this one when I no longer need it.Image hosting by Photobucket


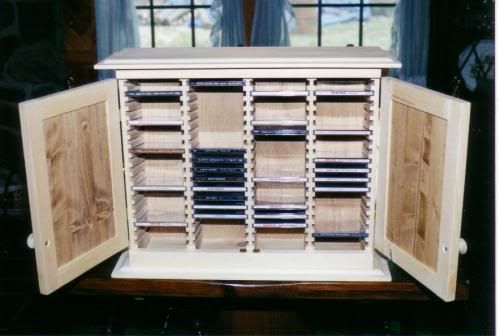
I have rarely built a project from plans. I usually design the stuff that I build from my own vision of what I want and go from there. This project below was different in that respect. My wife's Mom wanted this built for her for use as a coffer table. In reality, it's a bench, but it's size lent it to be used as a small coffee table. Built out of poplar, it was to be painted by her mom when she got it. Poplar is one of the better woods to use for potential painted projects since it takes paint so well.Image hosting by Photobucket


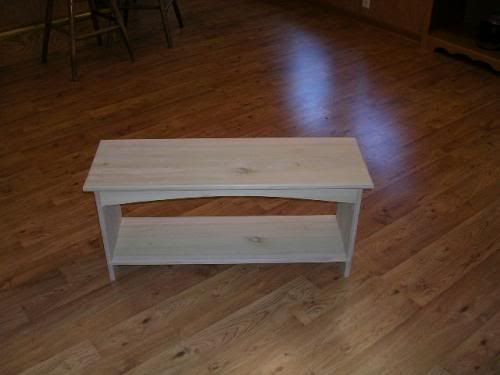
Well, on to bigger projects. The next handful of photos are of a six piece red oak bedroom set that I built over the course of maybe a year and a half or two. Not sure really. The photo below shows the 1st and 6th piece of the set. I started with the hutch and finished up with a beautiful armoir style dresser for myself. The dresser I had been using previous to this didn't have an "enclosure" as this one does up top. Why is that important? Well, with the numerous racing newspapers and monthly magazines of all sorts that I get, I had previously just stacked them all on top of the dresser and it was regularly an ugly pile. Now, they are stacked inside of one side of the upper portion of the dresser and out of sight. That equals a happy wife. And when the wife is happy - - I'm happy.Image hosting by Photobucket


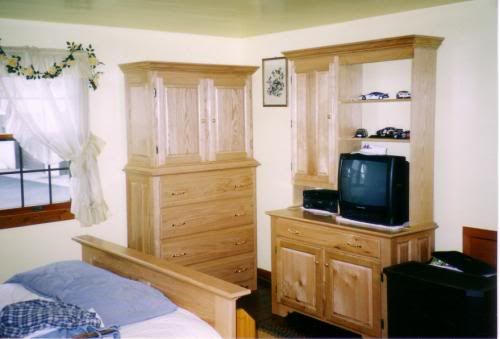
The bed was the next up after the hutch. I got the idea for this style of bed from a flyer from a local furniture store. The entire six piece project is of the raised panel style and the bed had the biggest panels of the project, both in the headboard and the footboard. Straddling each side of the bed you will see nightstands. And you guessed it, they were the next to be built in the project. Image hosting by Photobucket


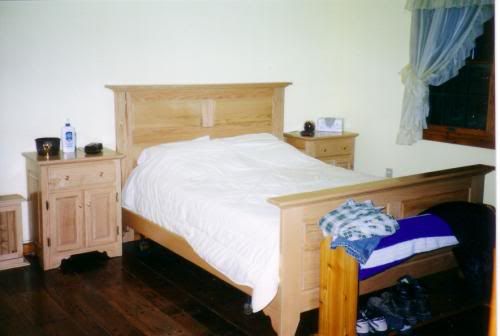
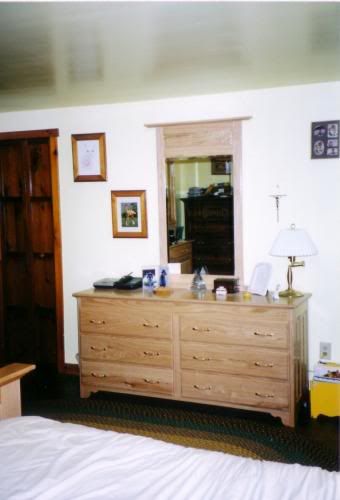
I actually wanted to build a more detailed dresser for Karen, but she opted for a simple design to go along with the rest of the set. I did work in an idea on the mirror that I had seen in a featured project in an issue of Wood magazine. A nice beveled edge mirror compliments the piece.


Image hosting by Photobucket


To finish off the bedroom project, I built these window shutters. Again, they are built from red oak, as the rest of the set was. These shutters were built using a jig designed by Norm Abram, or GOD, as he is known to many woodworkers. They were a blast to make, as was the jig, but they were a lot of work!Image hosting by Photobucket


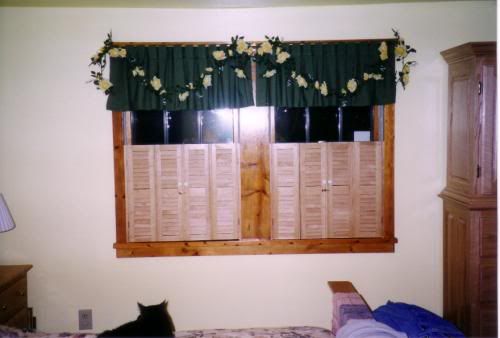
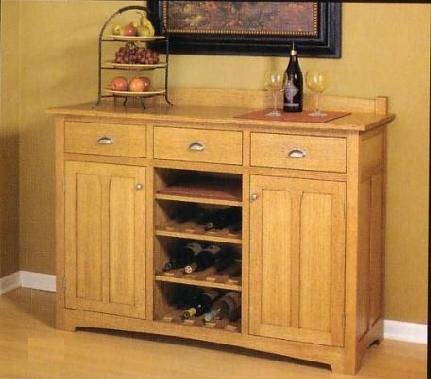
The wall unit below is one of my most recent projects. I built this while I was laid off recently and it really came out nice. Hangs behind the bar here at home in our bar room and it is really what I had been envisioning since I thought about what to do with this area about a year and a half or two years ago.Image hosting by Photobucket


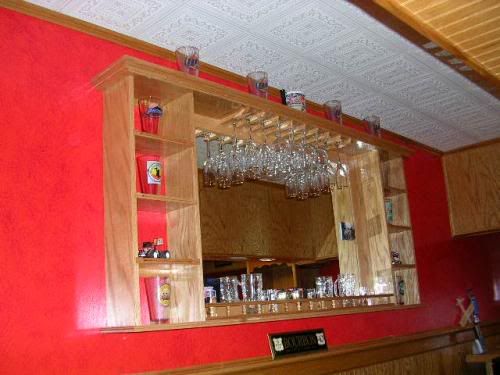
The potato bins below represent my first, and to date, only attempt at recreating something. The bin on the left of the photo is obviously the old one and was in pretty bad, but useable condition when it was found. Before I had built the oak bedroom set above, we had been using this four poster kind of canapy bed that I had built long before I had even had my wood shop. When I tore that down, I saved the wood and used some of it to recreate this potato bin to the right in the photo. An interesting project that encompassed some different things that I had never tried and it served a definite purpose for widening my skills in the shop. One thing I didn't copy from the old bin was the locations of the pulls. I liked them reversed from the old one.Image hosting by Photobucket


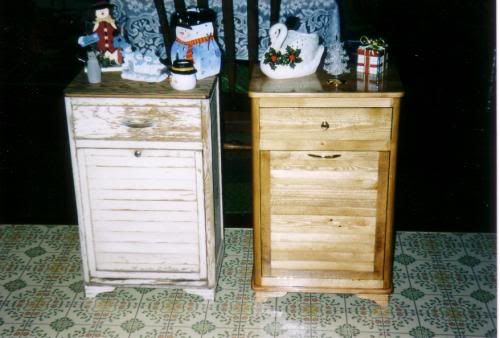
The bench below was something I built for some freinds of ours. Not a difficult project at all. Constructed of cedar wood that was originally intended for use as decking. It finished up so well, that I milled some of it down for use as lumber and this is the result of one of the projects.Image hosting by Photobucket


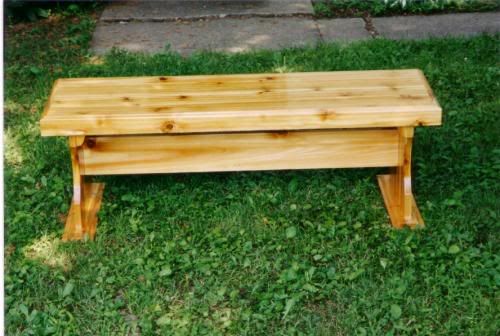
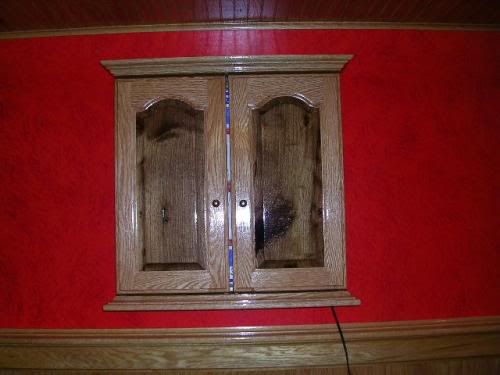
The two corner hutches below are something that my brother asked me to build for him. He and his wife were remodeling their dining room and wanted these two hutches for opposite corners of the room. Again, these are made of poplar since they wanted to paint them white. Some have asked why the raised panels on the bottom doors are already painted. That is because wood expands and contracts with the moisture content of the surrounding air. When you pre-paint the panels before constructing the doors, should they contract, you would not have the horribly ugly little strips of unpainted wood around the edges of the panels. The arched doors were the biggest challenge of this project. I had never attempted something like them. I had my idea of how to go about doing them, and in the end, it turned out great. But, I went into it not knowing that, so it was very rewarding mentally when it did. The upper cabinet features three moveable shelves and glass in the doors.Image hosting by Photobucket


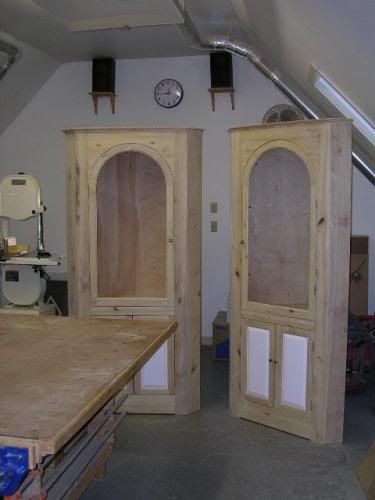
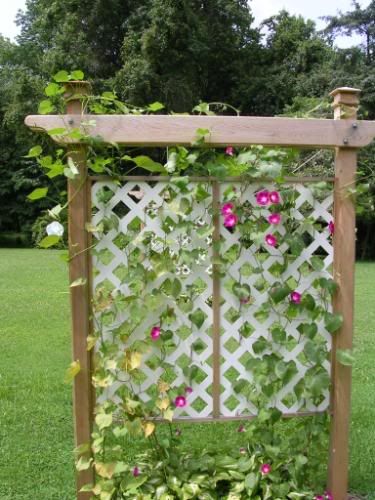
On to some outdoor projects. These arbors are, well, if you look closely, you can see clothes lines, so that would tell you that they are for that purpose. Built from clear cedar, they should last a very long time. We had grown tired of previous clothes line supports rotting, eventually leaning over and not staying plumb. These supports are well supported in the ground and should keep the wife happy for a very long time. I added the lattice in the middle and was a bit worried about it expanding to much in the hotter weather. Plastic does that. But apparently, I allowed enough room for it to expand and they are performing great.Image hosting by Photobucket


One of the supports is shown below with morning glorys growing up its lattice panel. Hostas compliment the ground area underneath all three of them.
Image hosting by Photobucket


Finally, although not a strictly woodworking project, I consider this one more a carpentry project, this is a badly needed shed I built about three years ago. It houses a number of yard machines like my wood splitter, a pressure washer, my backpack blower and chainsaw among other things.
Image hosting by Photobucket


Thursday, January 19, 2006

My workbench upgrade

Have had a nice supply of time lately to devote to my long planned benchtop upgrade in my shop. I originally built the bench top using 2X lumber and over time, well, let's just say that 2X lumber is not exactly what you would want to use. It twisted slightly over the years and became unacceptable. My recent purchase of the new DeWalt planer moved the upgrade closer to reality since it had long been planned to build my next planer into the bench top so that the bench itself would be utilized as an infeed and outfeed table. I also had plans on working another feature into the new surface also which will be shown later in this post.


The total length of the bench is roughly around thirty two feet and is divided somewhere near the middle by a Craftsman radial arm saw that is also built flush into the benchtop. Below is the half of the bench that will house the new DeWalt planer and the area that it will be located is circled. The collection drop above that area was put in place back when I installed the system with this future planer installment in mind.
Image hosted by Photobucket.com


Below you can see the bench stripped of its former top and pretty much ready for the adaptation framing to house the planer area.
Image hosted by Photobucket.com


With plenty of 2X lumber available from the former tops, I was able to rip down some of them to use as 2X4's for the framing parts. Here is the majority of the framing work done.


Image hosted by Photobucket.com


And here is balance of the framework done and the first test fitting of the planer in place. I've also added some additional framing over the empty spot over where the knee wall space access door is. This will provide more support for the new top.

Image hosted by Photobucket.com


The raising/support system was simple enough. As you can see in the previous picture, I used these 7/16" hex head bolts and epoxied large fender washers to the heads for a bigger "footprint" for stability. A nut and another washer on the upper part provided plenty of support to hold up the actual piece of ply that the planer sat on. With careful measuring during the framing process, and using the nuts on the five 7/16" bolts, it was a simple process of adjusting the planer to be flush with the work surface.
Image hosted by Photobucket.com


Here is this half of the benchtop pretty much completed with two layers of 3/4" MDF applied as a surface (treated with a coat of boiled linseed oil). I had plenty of oak beadboard paneling left over from my big bar room project and that is being used to cover over the front framing of the planer area which will be seen in a later picture.
Image hosted by Photobucket.com


This is the second half of the benchtop and the only change for this area is that I am going to recess a t-track into the surface to act as a "stop-block" mechanism for use with the radial arm saw. This will come in handy for the occasional times when I have a multitude of repetitive cuts of the same type. Set up the stop block (which I have yet to fabricate) and start cutting!
Image hosted by Photobucket.com


I wanted to run the benchtop almost right to the far corner of the room, but I needed to add additional support and this bit of carpentry did the job.
Image hosted by Photobucket.com


Below is the fitting up of the T-track and the following picture is that half of the benchtop surface completed with linseed oil and the edging applied.
Image hosted by Photobucket.com

Image hosted by Photobucket.com


The radial arm saw got a new surface also. The fence needed to be removable since it was in the way of the full width of the planers 13" capacity. I accomplished this by recessing 5/16" T-nuts into the table and this would allow me to bolt down the fence and remove it when needed for longer/wider pieces of lumber needed to be planed. With the fence in place, I still have over five feet of infeed capacity for the planer and eight or nine feet of outfeed. With the fence removed and a little other work, I can in reality have up to fourteen feet of outfeed. Infeed can actually be up to 21 feet, but with the max of 14 feet of outfeed, that point is mute.
Image hosted by Photobucket.com


And the job as it stands right now. The oak beadboard is applied to the front of the planer framing and I'm just waiting for the epoxy at the T-nuts to dry before attaching the radial arm fence. A fairly simple job that adds quit a bit to my shop environment and utilization. A great upgrade project that I have been planning for a long time. Total cost was around 200 bucks.
Image hosted by Photobucket.com

Wednesday, November 16, 2005

Darts anyone??

I have been waiting to construct a cabinet to house the Widdy dart board that I purchased months ago to be hung in the bar room. You can't have a bar room and not have a dart board in it!!!


With the cooler weather moving in, it is time to get back into the wood working shop and crank out some projects. Besides this cabinet, other projects planned for the bar room include a number of picture frames I need to build to hold a number of racing oriented lithographs. Also planned in a pool cue rack and a display shelf kind of thing for the wall behind the bar. I might even incorporate a mirror into it, though I have been wanting to make this huge display kind of framework to pin up a ton of racing pictures from the past. I don't know what I'm doing with that yet.


Anyway, the cabinet below is constructed of red oak with walnut panels in the doors. This combination is in keeping with the decor of the entire bar room. I used the same Waterlox marine sealer and high gloss finish on the cabinet that I used on all of the wood in the room and it continues to impress me with its finish and shine.


Image hosted by Photobucket.com


If you look closely, you can see that the board is lit by a strip of small lights at the top of the inside of the cabinet. Obviously, the doors are also used to house two dozen Widdy wooden and steel tipped darts.
Image hosted by Photobucket.com


Tuesday, November 08, 2005

Oswego (NY) Salmon Fishing

With the exception of the previous two years, a number of us have taken an annual weekend getaway salmon fishing trip to the Oswego, NY area. The Oswego River is internationally known as one of the top salmon fishing spots and the reputation is well deserved. King, Coho and Atlantic salmon are plentiful and big and pack a wallop when hooked on the end of a fishing line. It is this particular fact that continues to bring us back to this town every late October or early November.

This year's trip included five of us. Four of us, myself and my Brother Dave and his son Travis and our cousin's husband Kenny Smith are veterans of this annual pilgrimage. One rookie this year though was Larry Cavallo. I have always bugged Larry and a number of my other buddies to give this fishing a shot and see if they liked it. They always came up with some lame excuse not to make the five hour trip north. However, the annual dirt track race at the New York State Fairgrounds that is held during Super DIRT Week in early October was rained out this year for the first time in around thirty years and it necessitated a rain date and it happened to be rescheduled for the weekend of our fishing trip. THAT was enough for Larry to give it a shot.


An inordinate amount of rain leading up to the trip had us watching the internet for constant updates on the river levels. Right up until when we left, we weren't even sure about whether we would be able to get into the river. As it turned out, the levels fell down to "fishable" levels the day before we left and as luck would have it, we happened to hit a great weekend of weather and fishing conditions. PHEW!!!


The picture below is a shot of a large area of the river which is located just in front of the Niagra-Mohawk electric generating station. This shot shows a rather tame shot of the area. As I said, the river had been high for weeks prior to our arrival and thus, the river was lacking in fisherman actually in this part of the river. The right half - near to the generation station is a very deep section and is usually loaded with salmon. The far side is fished mainly for trout.
Image hosted by Photobucket.com


Well, we hit the river early after a Friday morning 4:15AM wake up call. There is nothing like latching onto a hefty salmon in the early am hours with the sun just coming up to make you appreciate what Mother Nature supplies you. That's me below with one of my first "hook-ups" of the day.

Image hosted by Photobucket.com


My nephew Travis has been a regular on these trips and enjoys the sport. Below, he takes a moment from his fishing to turn around a look into the camera.


Image hosted by Photobucket.com


Below is Larry and he is enjoying one of many battles he had that day with numerous salmon. He was quickly convinced that he should come back in the years to come to fish the Oswego River again.

Image hosted by Photobucket.com

We all hooked up and had the chance to yell "FISH ON!" many, many times during the day on Friday. Here is Dave during one of the many times he snared another Chinook.Image hosted by Photobucket.com

Kenny did much of his fishing as the guy the furthest up river of us and right around this massive boulder. Here below, he is doing his best imitation of the Captain Morgan commercial pose.

Image hosted by Photobucket.com

It didn't take long before we started to load up the stringers with the salmon. Here are a few pics of the bounty.

Image hosted by Photobucket.com

Image hosted by Photobucket.com

Image hosted by Photobucket.com

Image hosted by Photobucket.com

The gentleman pictured below was not one of our fishing party. He and another fisherman were fishing just below us and were doing just as well. In fact, he did fairly better than us. He happened to reel in not one, but two steelhead trout on the day. Pictured here is one of them.

Image hosted by Photobucket.com

After a number of hours in the morning, we had full stringers of three salmon each and headed up to the cleaning station to have the fish cut up into either fillets or steaks and bring them back to our hotel room cooler and take a quick rest and some lunch before heading back for an afternoon fishing session.

Travis probably landed the biggest salmon of the day and below, he is posing with the monster. No, that is not trick photography - the mouth of the salmon could have almost engulfed Trav's noggin.

Image hosted by Photobucket.com

Image hosted by Photobucket.com

The obligatory pictures of us holding up some nice catches follow.

Image hosted by Photobucket.com


Image hosted by Photobucket.com


Image hosted by Photobucket.com

Finally, some of our catch lies on the concrete floor of the cleaning station area. Within minutes, they will be transformed into fillets and steaks and packed into plastic bags for storage.

Image hosted by Photobucket.com

We had such a darned good Friday of salmon fishing, we made a last minute decision on Friday night to sleep in the next morning and arise maybe around eight AM and head down to the river and just check on the hole that we had been fishing and then if we didn't want to fish for salmon due to overcrowding, we would switch gears and do some trout fishing. As it turned out, it was a good decision as we managed to get a few to the net. None of them were the size that can come out of the Oswego River (and we saw a number of leviathans come out that day!) but to us they were large.


Larry, myself and Dave all managed to hook up with rainbow trout. All within five to six pounds. Larry also managed to bring in two nice little brown trout.

Image hosted by Photobucket.com

Image hosted by Photobucket.com

Image hosted by Photobucket.com

Image hosted by Photobucket.com

As always, it was another great time on the river - having a great time and catching some monster fish. The fishing in Oswego is an entirely different world of fishing than we are used to here in NJ. We look forward to each year's trip with much anticipation. Can't wait until next year. FISH ON!!